A thread is the ridged part of a screw or bolt shaft that can be screwed into something with opposite threads. There are different standard measurements for the threads of both screws and bolts.
Measuring thread dimensions, especially the thread’s major diameter, and pitch, is necessary to identify unknown threads. The process of using calipers and pitch gauges is simple. In this guide, in this article, we demonstrate these tools and how to measure thread dimensions in both inch and metric measurement systems.
In addition, we are introducing a purely manual thread testing machine that reduces labor costs, improves work efficiency, and performs accurate and efficient thread testing.
General Instructions
•Measure screw diameter. or screw size, by measuring the width of the threaded part of the screw. This corresponds to the first number of the thread size. For inches, any diameter smaller than 1/4″ is indicated by a number, referenced in the table below (e.g. 8 corresponds to 0.164″). For metric screws, this is the number of millimeters preceded by the letter M (e.g. M6 corresponds to 6 mm).
•Measure thread spacing. This corresponds to the second number of the thread size. For inches, this is done by counting the number of threads in an inch. For metric screws, this is the length in millimeters between threads.
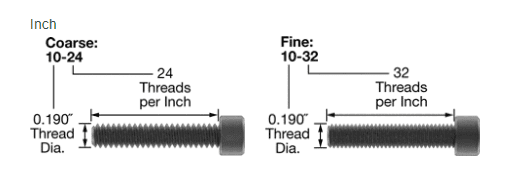

•Inch thread sizes are specified by diameter and threads per inch. Diameter is also known as screw size. For those with a diameter smaller than 1/4″, screw size is indicated by a number (e.g., #10 or No.10). For example, a 10-24 screw has 0.190″ thread diameter and has 23 threads per inch.


Tools for measuring thread size and pitch
Three tools for measuring thread major diameter and pitch are the Vernier caliper, a pitch gauge, and a ruler.
Vernier caliper
For measuring the major diameter of a threaded fastener, whether internal or external, nothing beats a Vernier caliper (Figure 1). The upper jaws situated at the top of the device’s head (A in Figure 1) are used to measure internal thread diameters while the lower jaws (B in Figure 1) measure external thread diameters. The main scale (C in Figure 1) indicates the whole number part of the measurement and may be calibrated in centimeters or inches. The decimal portion of the measurement is indicated by the Vernier scale. On a metric version of this tool, each hash mark represents one millimeter; On an imperial one there are twenty-five hash marks per inch each representing 0.025 inches.
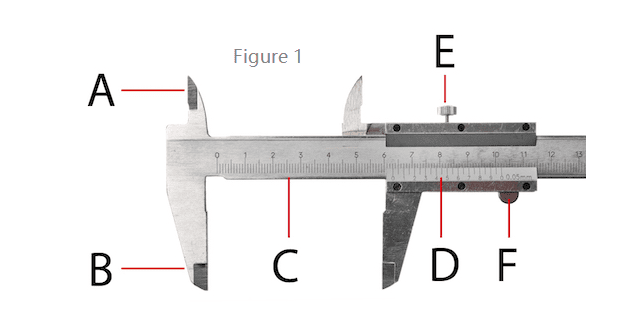

Figure 1: A close-up view of a Vernier caliper scale showing its various parts such as upper jaws (A), lower jaws (B), main scale (C), Vernier scale(D), lock screw(E), thumb screw(F).
Measuring a thread with a Vernier caliper
To measure the major diameter of a threaded fastener, it must first be determined if the thread is tapered or not. If this cannot be done by visual inspection alone then take three readings with the calipers at different points along one side of four consecutive peaks beginning nearest where they start and ending farthest from there. When these points differ in size, shape length etc., it means that there’s tapering somewhere along those threads but if all measurements give same value then we have straight cut threads somewhere else between them too. In case where there is tapering; record largest among values obtained when measuring major diameter at either fourth or fifth peak counting from either end otherwise any will do for straight cuts.
If you’re measuring an external thread’s major diameter put jaw tips on its crest; if it’s internal thread then put them into groove instead. For bolts you’ll need to measure shank length so take measurement from under head down to start of thread. Here are step-by-step instructions on how to use a Vernier caliper for measuring threaded fasteners:
- Place an externally threaded fastener between the lower jaws or place the upper jaws inside an internally threaded fastener.
- Use the thumb screw (Figure 1labeled F) to bring the jaws into contact with the threading.
- Upon contact, turn the lock screw (Figure 1labeled E). The lock screw stops the caliper from adjusting while the measurement is being read.
- Look at the 0 on the Vernier scale. The number on the main scale that the 0 matches with determines the integer and first decimal of the measurement.
(It is likely the 0 will not match perfectly with a number on the main scale but will rather be between two numbers.) - Look at the division lines on the Vernier scale. The division line that lines up the closest with a line on the main scale determines the second decimal of the measurement.
The caliper in Figure 1 appears to open to the measurement of 6.31 cm. The 0 is at 6.3, and the line marked 1 on the Vernier scale matches up the closest with a line on the main scale.
Measuring a thread with a ruler
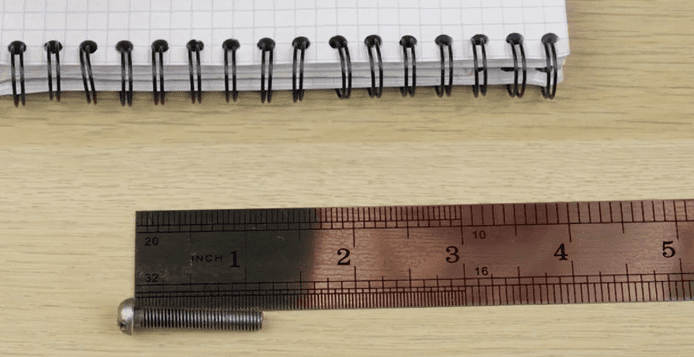
A ruler can measure the major diameter and pitch of a threaded fastener. However, it’s not as precise as using a caliper. The ruler should be high resolution and show measurements to a fraction of a millimeter. To measure the pitch of a thread in the United States or Canada, measure the threads-per-inch (TPI). To measure the pitch of a metric thread, measure the distance between two consecutive crests.

Measuring pitch with a pitch gauge
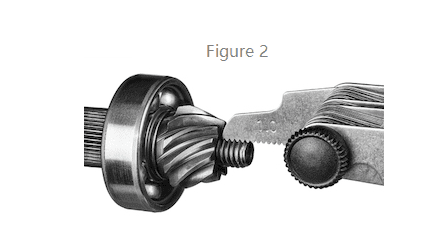

Figure 2 shows a pitch gauge measuring a thread. Pitch gauges can be metric or imperial. A pitch gauge has several leaves with a number stamped on it. The number indicates the pitch. When identifying an unknown thread, it’s important to have an imperial and metric gauge. There are similarities between metric and imperial threads that may lead to a false positive. For example, a metric pitch gauge may appear to match some imperial threads. An imperial gauge will have a closer match and provide the correct pitch.
Next, we recommend a thread inspection instrument that we have designed and developed independently, which greatly saves labor and improves the efficiency and accuracy of inspection, and has been highly evaluated and praised in the industry.
Explanatory video for measuring threads

Frequently Asked Questions (FAQs)
1、What does M10 mean on a bolt?
Metric threads are designated with a capital M plus an indication to their nominal outer diameter and their pitch: This bolt is M10 x 1.5 – which means the outside diameter is 10mm and the threads are 1.5mm apart (the most common thread pitch for M10).
2、How do I know if my bolt is M10 or M12?
M10 male fasteners are usually 1.5 mm or 1.25 mm distance from crest to crest. M12 male fasteners are usually 1.75 mm or 1.5 mm crest to crest.
3、How do you differentiate between M8, M10, and M12 bolts?
Measure them. An M8 is 8mm in diameter, and M10 is 10mm in diameter, and an M12 is 12mm in diameter.
4、Is M10 18mm?
For producing recessed holes for cap screw heads. Excellent for drilling Steels (Magnetic soft steel, Structural steel, Carbon Steel & Alloy Steel) and Synthetic materials
5、What does M10 1.5 thread meaning?
M10-1.50 is a coarse thread denotation while M10-1.25 is a fine pitch. The reason is that in metric threaded fasteners the pitch is measured by the distance between the threads. So in the coarse threaded M10-1.50 fastener, there are 1.50 mm between the threads and 1.25 mm between the threads on the fine one.
6、What is a thread checker?
The Original Thread Checker – An accurate and easy-to-use thread identifier for both nuts and bolts. Each individual gauge features a male threaded stud on one end and a female threaded hole on the other. The Thread Checker is especially well suited for distinguishing between similar inch and metric threads.

